Hello everybody, welcome to our recipe site, looking for the perfect Homemade Yeast Milk Bread recipe? look no further! We provide you only the best Homemade Yeast Milk Bread recipe here. We also have wide variety of recipes to try.
Before you jump to Homemade Yeast Milk Bread recipe, you may want to read this short interesting healthy tips about Ways To Live Green And Spend less Money In The Kitchen.
Remember when the only individuals who cared about the natural environment were tree huggers as well as hippies? That has fully changed now, since we all seem to have an awareness that the planet is having difficulties, and we all have a part to play in fixing it. Unless everyone begins to start living more eco-friendly we won’t be able to fix the problems of the environment. This needs to happen soon and living in ways more friendly to the environment should become a goal for every individual family. Read on for some methods to go green and save energy, largely in the kitchen.
Maybe the food is not quite as good when cooked in the microwave, but it will save you money to use it over your oven. The energy used by cooking in an oven is actually greater by 75%, and maybe this small amount of knowledge will spur you on to use the microwave more frequently. Compared with your stove, you can make boiled water as well as steamed vegetables faster, and use considerably less energy, by using countertop appliances. Many individuals incorrectly believe that doing the dishes by hand uses less energy than a dishwasher. Mainly if you make certain the dishwasher is full previous to starting a cycle. Save even more money by air drying as well as cool drying your dishes instead of heat drying them.
The kitchen by itself offers you many small means by which energy and money can be saved. Green living is actually something we can all accomplish, without difficulty. A lot of it truly is merely making use of common sense.
We hope you got benefit from reading it, now let’s go back to homemade yeast milk bread recipe. To cook homemade yeast milk bread you only need 7 ingredients and 23 steps. Here is how you do it.
The ingredients needed to make Homemade Yeast Milk Bread:
- Get 250 grams ☆Bread flour
- You need 15 grams ☆Sugar
- Get 4 grams ☆Salt
- Use 155 grams Milk
- Get 100 grams Homemade yeast bread starter
- Use 10 grams Shortening or Unsalted butter (room temperature)
- You need 8 grams Vegetable oil
Instructions to make Homemade Yeast Milk Bread:
- Put the ☆ ingredients into a bowl and mix well. Add milk and the bread starter and use your fingers or a rubber spatula to mix gently until no longer floury.
- Put the mixture from Step 1 into a bread maker or kneader. Use a rubber spatula or pastry scraper to thoroughly scrape all of the dough out of the bowl. Knead for 15 minutes (until the dough is nice and smooth).
- After 15 minutes, stop kneading, and use a pastry scraper or your hands to divide the dough into about 10 chunks. This will make the oil blend into the dough more easily. Return the dough to the bread maker or kneader.
- Add in the room-temperature shortening (or butter) and the vegetable oil, and knead for 10 more minutes. Kneading is complete when a gluten film forms and the dough is translucent enough for you to see your fingers through it when you stretch it out thinly.
- Take out the dough and form it into a smooth ball by folding it in on itself and pressing the seams of the dough ball tightly closed. Put it into a plastic bag. Hold the mouth of the bag loosely to press out the air, and then tie it shut.
- Leave the dough at room temperature overnight to let it rise to a little more than double its original volume. ※The number of hours that this step takes will depend on the temperature of the room. If the dough is rising quickly, you can slow it down by putting it in the refrigerator after awhile.
- ※ In my particular case, I let the dough rise at room temperature from about 9 PM until about 8:30 the next morning (in a chilly time of year). The amount of time that the rising takes really varies widely depending on the room temperature and so forth.
- The next day, once the dough has risen enough to fill up the bag, it's ready for the next step. Take the dough out of the bag and knead it about 3 times by turning it over, folding in the edges and pushing out any air bubbles.
- Divide the dough into two portions and form each into a round ball with a smooth, taut surface. Place plastic wrap over the balls of dough and give them about 30 minutes of "bench time" to rest at room temperature.
- Use a rolling pin to roll out each ball of dough into a 25 cm oval, pushing out any air bubbles as you go. Fold in the sides of the oval so that the right and left edges overlap a bit in the middle.
- With the rolling pin or your hands, press in the sides of the dough to fit the width of your loaf pan and then roll the dough up starting from the end closer to you. Use your fingers to pinch the end of the rolled up dough firmly closed.
- Put the rolled up dough into a greased loaf pan, and gently press down on the top of the dough with your fist to slightly flatten and even out the height of the rolls of dough.
- Cover with plastic wrap and put it into the oven on the bread-rising setting at about 30 ℃ for about 1.5 hours to let the dough rise a second time. The amount of time is approximate. Let it rise until the top of the dough is about 1.5 cm from the top of the pan.
- Pre-heat your oven to 220 ℃. The dough will continue to rise while the oven heats up, so keep it in a cool pace until the oven is ready. Just before you bake it, the dough will have risen to about 1 cm from the top of the pan.
- Bake the bread in the preheated oven at 220 ℃ for 15 minutes, and then lower the temperature to about 190~200 ℃ and bake for an additional 13 minutes. When it's done baking, drop the pan once firmly on a hard surface to loosen the bread so you can remove it from the pan.
- If the bread seems stuck to the pan, you can knock the sides of the pan against the sink or some such place, and it will come loose.
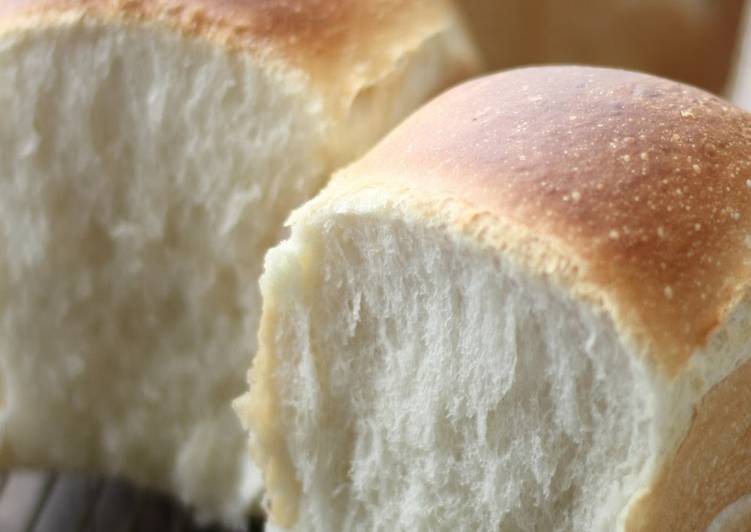
- It's so fluffy and soft!
- When I let the dough sit for the second rising until it filled up 90 percent of the pan, it spread into the corners too tightly and came out with sharp edges like this.
- The homemade yeast bread starter is made with 1 part starter liquid and one part flour mixed with a pinch of salt. It's ready to use on the 4th day. This time I used grape yeast.
- For this loaf, I used Golden Yacht brand flour and baked the bread with rounded tops. To get this rounded top, on the second rising, let the dough rise all the way to the top of the loaf pan and then bake for 25~30 minutes at 190 ℃.
- These photos are from a time when I let the dough rise overnight for about 8 hours at a room temperature of about 20 ℃ and then, because of my schedule, put the dough in the refrigerator for about 2 hours for the second rising.
- Here are some freshly made white bread rolls. I made these by dividing the dough into portions of about 50 g and baking for 10 minutes at 170 ℃ and then an additional 5 minutes at 160 ℃. They came out so light and soft.
- These are round-topped loaves made with Haruyo Koi Blend flour.
If you find this Homemade Yeast Milk Bread recipe helpful please share it to your close friends or family, thank you and good luck.