
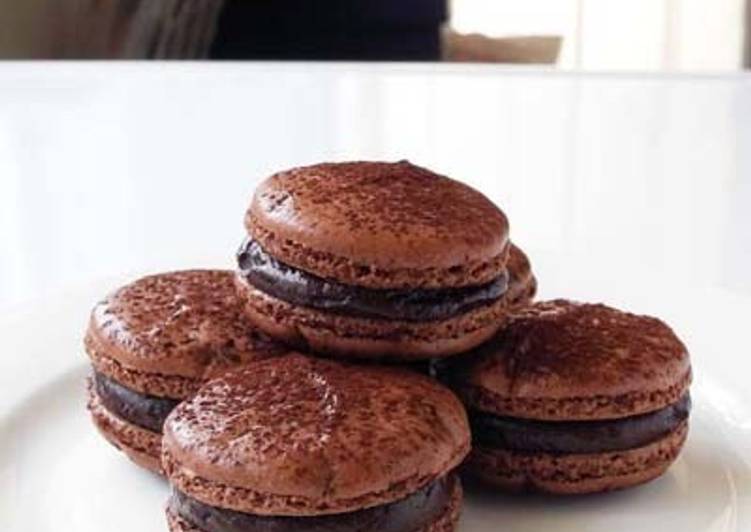
Rich Bitter Chocolate Macarons.
Ingredients of Rich Bitter Chocolate Macarons
- You need 64 grams of Almond flour.
- It’s 60 grams of Powdered sugar.
- It’s 22 grams of Egg white number 1.
- It’s 26 grams of Cocoa mass (or unsweetened chocolate).
- You need 2 of drops Red food coloring (optional).
- You need 60 grams of ★Granulated sugar.
- You need 15 ml of ★Water.
- It’s 22 grams of Egg white number 2.
- Prepare 1 of Cocoa powder (for topping).
Rich Bitter Chocolate Macarons instructions
- First make the chocolate ganache.
- If the almond flour was moist, sift it and dry it by putting it in the oven at 120℃ for 2 to 3 minutes..
- Using a 4cm ring cookie cutter, draw 24 circles on the parchment paper (these will serve as your guide when you pipe out the macarons onto the baking sheet)..
- Place the paper from Step 3 on a baking sheet, and place another parchment paper on top..
- In order to work quickly, have your equipment such as the whisk, the pastry bag and tip (1cm), and thermometer ready and laid out..
- Measure the ingredients correctly and have them ready as well. The egg whites should be at room temperature..
- Combine the almond flour and the powdered sugar and pulse it 10 times in a blender. This is to break down the coarse flour. Oil will start coming out if you overdo it, so be careful..
- Sift the powder from Step 7 twice with a coarse sieve (if the holes in the sieve are too fine, you cannot strain the almond flour). Remove the larger grains..
- Add 1~2 drops of red food coloring to egg white number 1..
- Add the Step 9 egg whites into the almond flour and sugar mixture (do not mix yet)..
- Melt the cocoa mass over a double-boiler. Remove it from heat once it has reached 122℉..
- Set the rack in the middle of the oven. Place trays in the upper and lowest racks (to prevent browning) and preheat at 180℃ (350℉)..
- Combine the ingredients marked with ★ in a saucepan and heat over medium heat to make a syrup..
- Once the syrup from Step 13 has reached 110℃ (230℉), start whipping egg white number 2 on high speed. Whip until peaks form..
- Once the syrup has reached 115℃ (240℉), slowly drizzle it into the egg white. Continue to whip on low speed as you add the syrup..
- Once you have finished adding the syrup, continue to whip the egg white on high speed until it cools down to 50℃ (122℉). The Italian meringue is now complete..
- Add 1/3 of the meringue into the bowl from Step 10. Mix it quickly with a spatula..
- Mix it well by pressing the spatula to the bottom of the bowl (to dissolve the sugar completely in the warm meringue)..
- Add the remaining meringue and fold it in, first with a cutting motion, then by lifting the batter from the base of the bowl with the spatula..
- Add the melted cocoa mass from Step 11 and mix by rubbing it onto the bottom of the bowl with the spatula..
- Mix it well so that the cocoa mass does not sink to the bottom. Continue the "macaronnage" mixing by folding the batter from the bottom of the bowl..
- When the batter is slightly glossy and falls like a ribbon from the spatula, it is complete..
- Pour the batter into the pastry bag and make 24 4 cm circles on the parchment paper. Make it slightly smaller than the circles on the paper because the batter will spread a bit..
- Lightly drop the tray onto the work surface twice to remove the large air bubbles, and pop the small bubbles with a toothpick (otherwise the macarons will crack or go out of shape)..
- Remove the pattern sheet, and sift some cocoa powder on top. Leave it to dry for 30 minutes (on a humid day, leave it for even longer)..
- Once the surface feels dry, it is ready to bake. If they aren't dried well, the shell of the macarons will crack..
- Bake for 12 minutes at 180℃ (350℉). After 5 minutes and 8 minutes, open the oven to let the moisture escape. Turn the baking sheet around half way through the baking process..
- When the shell is hard to the touch when you lightly press its side with your finger, and no longer sticks to the parchment paper, it is done..
- After removing from the oven, immediately add a teaspoon of water under each corner of the baking sheet (the steam will allow easy removal of the paper)..
- Immediately move the baked shells, paper and all, onto a table or counter (to prevent further baking)..
- Once the shells have cooled a bit, remove them from the paper and transfer them to a wire rack to cool completely (before adding the filling, flip half of them)..
- Pipe out the pre-made chocolate ganache to 12 of the macaron shells. Pipe out a nice, big portion!.
- Sandwich the ganache with the rest of the shells and you are done. If you put them into a sealed container and refrigerate, they are good for up to 3 days. Best eaten at room temperature..
- *Cross-section of the macaron. The cocoa mass shells are moist, soft and rich like a soufflé..
- *If you leave them in the fridge for 2 days, the shell and ganache will become even more moist and soft, making it even more delicious..
- For long-term storage: Wrap them individually in plastic wrap and freeze them in a sealed-container or a zip-top bag and they keep for several months. You can give them away as gifts..
- *It is best to use old egg whites. For best results, put the egg white into a container and put a plastic wrap over it. Poke a few holes with a toothpick and leave it in the fridge for 1-2 weeks..
- *I put 2~3 egg whites into each sealed-container and freeze them. I defrost them in the refrigerator a few days before making the macaron..
- *If you can, use powdered sugar that does not contain cornstarch. If you cannot procure any, make it by putting granulated sugar through a food processor..
- *If you make the powdered sugar from granulated sugar, be patient and make sure it becomes fine and soft..
- *However, if you blend for too long at once, it might overload the motor of the food processor, so do it over 2~3 times..
- *If you don't powder the sugar enough, your shells will have cracks like shown in the photograph!.
- *I used 4g more of the almond flour than in the original recipe (this is because some larger grains of the flour are sieved out)..
- *On a humid day, it helps to turn on the dehumidifier in the kitchen and keep the humidity at around 35%..
- *This recipe is tailored for gas ovens in American homes. The temperatures and cooking times should be adjusted to match Japanese electric ovens..